youtube facebook twitter instagram
Drevet av Blogger.
  • Hjem
  • Nettbutikk
  • Designteam
    • DT Sissel
    • DT Kirsten
    • DT Anita
    • DT Linda
    • DT Annika
    • DT Helle
    • DT Cathrine
    • DT Elin
  • Om oss
  • Kontakt
  • Maler & tutorials

HOBBYKUNST

 I took a short break from making Christmas cards to make a fall birthday card for a friend. I used the new stampset from Mathia design and watercolored it in a clean and simple.


I started by cutting a panel of watercolor paper and using my Misti, stamped Mathia's mushroom stamp with Vintage Photo and the sentiment with Barn Door. I painted the mushrooms and grass with van Gogh watercolor and let it dry completely. I had left the mushroom stamp in the Misti so I could stamp over it again with Vintage Photo to bring back some of the details that painting has covered.

I then took the adorable leaf stamps that are with the stampset and stamped them randomly on the card from the sentiment to down to the mushrooms in Spiced Marmalade, Lumberjack Plaid and Barn Door.

I attached the painted card panel to my kraft card base with Scor tape and added a piece of white paper inside to be written on. 

Until next time...
Dawn

09:00 No kommentarer

 With the confirmation season right around the corner, I thought I'd try my hand at a card for a boy that could be used for it, or maybe just a basic birthday card!

This one is pretty simple and very easy to duplicate. First, I took a piece of watercolor paper and made a big blue puddle on it with watercolor paint. I let that dry and in the meantime, stamped Morten on to another piece of watercolor paper. I painted him in with watercolor and once dried, fussy cut him out.

I cute the background piece into even pieces and attached them to the card. Then I stamped the sentiment multiple times in Versafine ink, staggering them so they could be read no matter what was added on top.


I attached Morten to the panel and then attached the completed panel to my card base. 

Until next time...
DT Dawn

09:00 No kommentarer

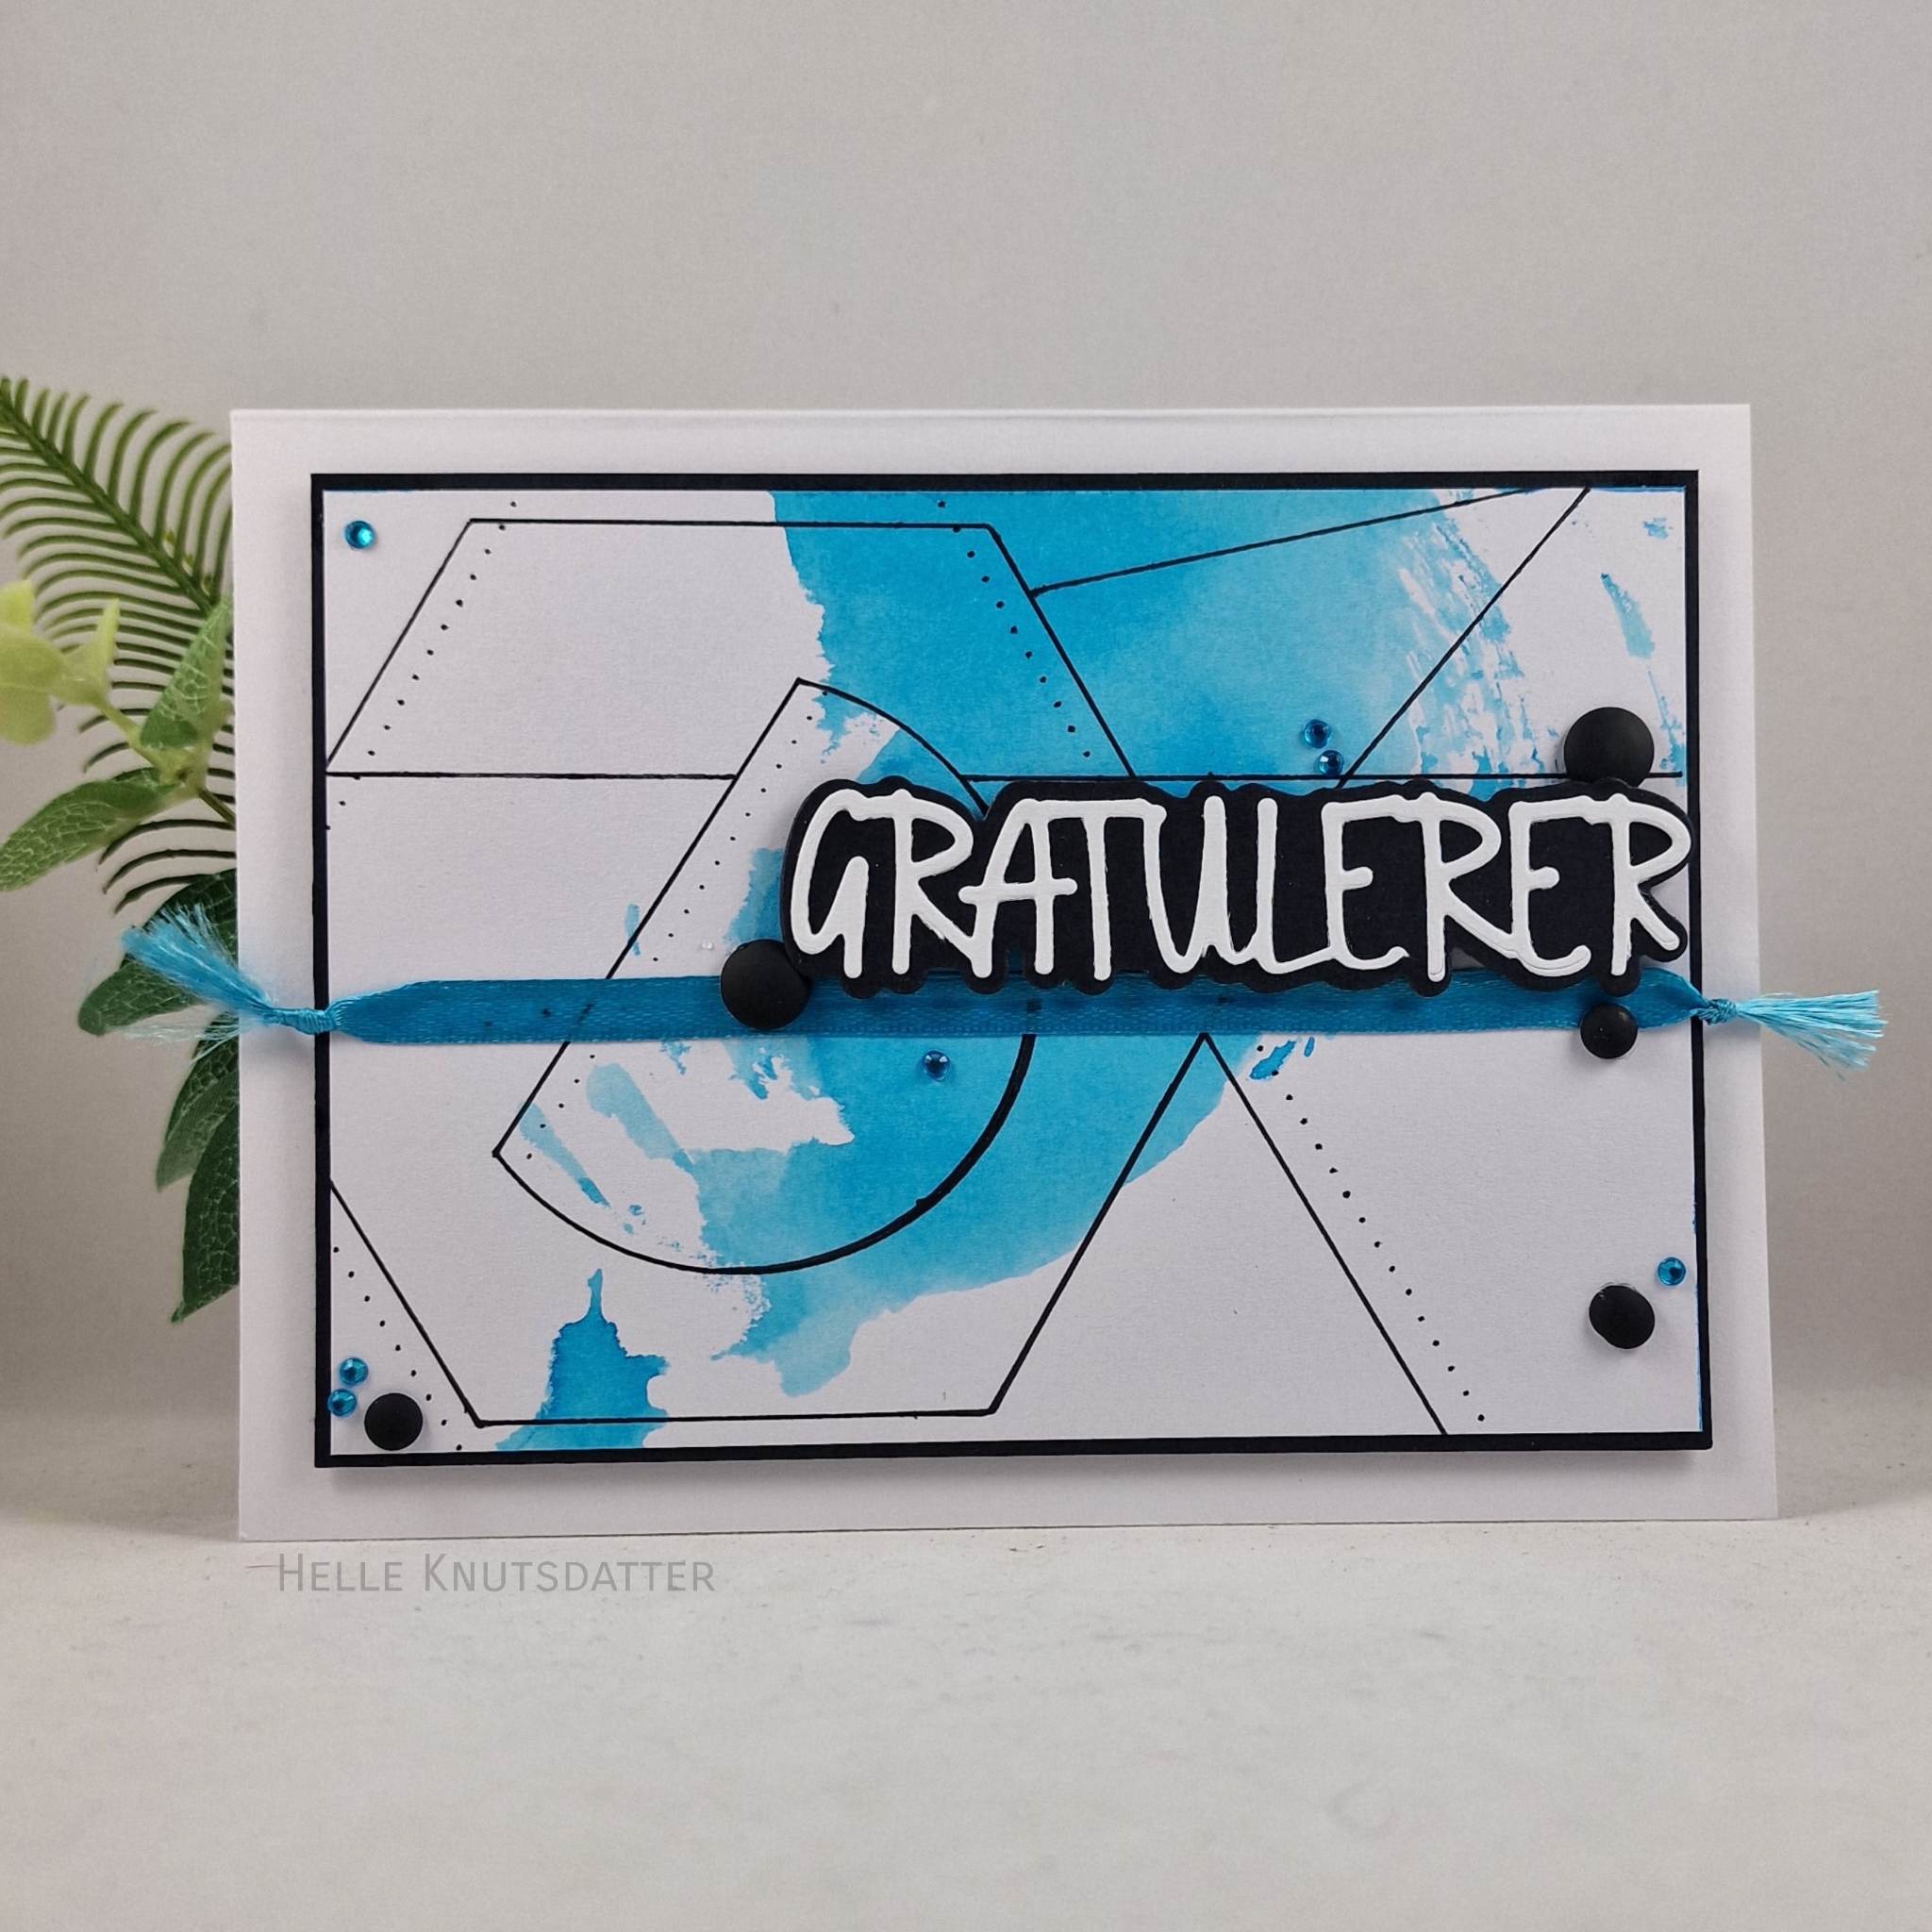
 Merker at vinteren nærmer seg slutten, for da hentes farger frem fra dvalen.
I dag ble det de spreke fargene fra 
INKON3
som jeg har brukt


MARILYN RED
MARIGOLD ORANGE
BEE STING YELLOW
PIGMENT LINER 0,7mm
PIGMENT LINER 1,0 mm

GRATULERER
er en die fra 
PAPIRDESIGN


InkOn3 
PEACOCK BLUE
AKVARELLKARTONG
er flott å bruke når vi mikser farger med vann
Blokken jeg linker til er 200g/m2, sÃ¥pass tykk at den krøller ikke 
Tørker arket litt med denne 
VARMLUFT PISTOLEN
fra 
RAYHER
Jeg ar veldig glad i de ferdige
KORTBASENE
 som finns i mange størrelser og farger


GODDESS GREEN


PÃ¥ dette kortet har jeg splattet litt vann
og 
tørket det bort sånn at det ble noen "fargeløse" store flekker


Stjerner og bokstaver er fra 
PAPIRDESIGN
💙💚💛💜💗

Ønsker dere en fargerik ny uke
-Helle-


11:26 No kommentarer

Today I'm bringing you a card that could be used for a birthday, konfirmasjon or any other type of celebration. I've used Martine from the Mathia collection with soft colors.


To create the background, I stamped 3 different stamps from Mathia - the wording from bakgrunntekster,  the backpack from ut pÃ¥ tur, and the flowers from VÃ¥ren kommer. I used 4 different Distress Ink colors - Saltwater Taffy, Villainous Potion, Shaded Lilac, and Spun Sugar.


I randomly stamped the 3 different stamps in different colors and places, trying to balance out color and placement so it was interesting but not too busy or concentrated in one area. I then used a blender brush with Spun sugar to add some color. 

I stamped Martine on to watercolor paper and painted her with watercolor. When that was dry, I carefully fussy cut her out. I cut a small piece of heatproof acetate and stamped the sentiment on it in embossing ink. I then heat set gold embossing powder on it.


I attached Martine to the acetate and then added foam tape in very small pieces underneath the embossed sentiment and Martine so it appears like it's floating. It's a great way to give dimension and interest in a card that isn't often seen.

I attached that panel to my card base to complete it. In the end, you have a nice card with soft colors and dark contrast that is interesting and a bit unique.


Until next time...
DT Dawn

09:00 No kommentarer

 If I'm not coloring or painting full scenes, my style preference is Clean & Simple. While I admire cards with many decorations and flowers on them, I lack the imagination of how and where to put all the things. So my default is C&S, which I bring to you today in the form of a Valentine's Day card.


I started by stamping Stampingbella's Bubble Dandy Lion and sentiment with Versafine black ink on watercolor paper. I painted in the images with watercolor paint and added a little green and blue for grass and sky. 


Once it was dry, I used my Micron to add some stitches along the side with hearts in the corner. It adds interest in a complimentary and simple way. I added some Scor-tape to the back of the panel and attached it to my card base. 

A Clean & Simple Valentine's Day card for the one you love!


Until next time...
DT Dawn

09:00 No kommentarer

 I thought the new Mathia stamp, Martine, would be a good image to make a modern, clean and simple konfirmasjon card.


I first stamped this hip young gal on to a piece of watercolor paper. I painted her in with my watercolor paints and once she was dry, fussy cut her out.


I then stamped the two sentiments from the Martine stampset and the Nedover tekst stampset in Versafine ink. I wanted a splash of color for the background but also wanted to keep it simple.

I took my Distress Ink pad in Ripe Persimmon and just dragged it lightly across the cardstock so I would get some uneven areas of color. I really like this technique when I'm not quite sure what I want but know I want some color.

I attached my image and the card was done. Clean, simple, and fast - my go to type of card when I don't have a detailed plan in mind. :)


Until next time....
DT Dawn
09:00 No kommentarer

Jeg er fortsatt i gang med de herlige nye Mathiastemplene. Her var det egentlig turtekstene til Mathia sin nye stempelplate "Ut pÃ¥ tur" som inspirerte til akvarellmotivene.


Motivene er malt på akvarellpapir med distress ink. Her er det kun brukt to ulike blåfarger, samt litt hvit gesso.


Tekststemplene er hentet fra Mathia sin nye stempelplate "Ut på tur".


Her er stempeltrykkene, trykket med Versafine stempelpute.

De to kortene er relativt enkelt pyntet, slik at motivet og teksten egentlig danner hele pynten.


Det første kortet har bakker med trær, mens det andre kortet viser fjell.


Ønsker dere en riktig god scrappeuke videre.


10:00 No kommentarer

For a nice, quick card, adding watercolor to a stamp is a great way to go!


I stamped out LDRS' magnolia stamp on watercolor paper with waterproof black ink. I then used clear water to paint inside the petals and dropped small amounts of watercolor paint in that area to let it mix on it's own. 


While that dried, I choose ink pad colors that were close to and complimented the colors in the flower. I used those to stamp Mathia's background gratulerer stamp. I used the same colors and stamped Mathia's sentiment on a scrap piece of card stock. 


I cut a small piece of black paper to frame the image. I added some bling in the form of a gold perler pen and attached the sentiment to the image. I popped up the flower image with foam tape and centered that on my background panel. I then attached the finished piece to my card base.


Until next time...
DT Dawn

09:00 No kommentarer

 Happy New Year!
What creative plans do you have for the new year? I like to have creative goals for the year so I can spend time to learn new techniques and grow my skills. This year will be all about classes! There are an abundance of classes and tutorials online. I have classes scheduled with my favorite artists and a membership to Skillshare so I'm ready! Let me know what you'll be working on by leaving a comment.

After the past months of holiday focus, I thought I would open up the year with a symbol for new beginnings. I know that sounds cheesy but the sky depicts a new day with new possibilities!

I used watercolor to blend yellow, orange, blue and purple on the whole page. Watercolor can be freeing if you allow it to do what it wants. In this case, I think it delivered fairly well.


I then took the mountain stamp from Studio Light and stamped it with Versafine black ink. I used my Misti so I could stamp multiple times and get a good imprint on the textured watercolor paper.

I heat embossed the image with clear embossing powder. I then stamped Mathia's sentiment on scrap card stock and picked out some paper colors that would match with the card while still highlighting the sentiment.


I lined up everything, popping up the sentiment with foam tape, and attached it all to my card base.  I really do enjoy the scene, the brightness of the yellow and the earthiness of the mixed browns. What do you think?

Until next time...
DT Dawn


09:00 No kommentarer

Watercolor can be daunting if you want to paint realistic items. But with the help of stamps, you can make a really pretty card with literal splashes of color!

I started by stamping Picket Fence's Watercolor Roses stamp on watercolor paper. I used my Misti and stamped it a couple of times to get a solid imprint. Once the ink was dried, I wet the whole image with water and dropped red, pinks and greens from my watercolor pallet onto the water and swirled them around a bit. I let it dry and then added highlights to the center with my white gel pen.


I wanted to break up the image so I cut it diagonally and spaced it so a sentiment could fit in between the pieces. I then stamped Mathia's Gratulerer in red ink on the card base. I first stamped it in the center and then went back and stamped it appropriately on either side so it looked like it was continuous.


I attached the watercolored panel so the sentiment would have the focus and attached everything to my card base. I added some bling in coordinating colors and my card was complete!


Until next time...
DT Dawn

11:00 No kommentarer

 Today I have a versatile card that could be given for many different reasons. I got the chance to play with this mountain stamp from Studio Light and I'm pretty happy with it!

This background is versatile and very simple to make. I used watercolor paint and paper for this particular card but you could very easily make something similar with other mediums, like Distress Ink.

I chose a few mixes of blue, blended them all together and let it dry. Then I took this mountain image and stamped it with embossing ink multiple times using my Misti.


I sprinkled on white embossing powder and heat set it. Then I took a sentiment from the Mathia artsy stamp set and stamped it in a matching blue. (If you use Distress ink, you can color match it perfectly by using the same ink.)


I used a scrap piece of black paper to give it a very thin border on the left & right sides and attached that to my card base along with the sentiment strip. 

This card was extremely simple to make and will make an excellent card for men or for Jul/Christmas! Just add some snow with a white gel pen, choose a holiday sentiment and you're done!


Until next time....
DT Dawn

09:00 No kommentarer

This sweet, hand-painted scene is a wonderful way to give someone a handmade card for a birthday or other special occasion.

I painted a couple of simple tree branches with a blue sky as the background for these cute MFT birds. I also painted the birds in watercolor on watercolor paper. 

Then I stamped Mathia's Gratulerer stamp and set a sub-sentiment inside. I trimmed the sentiment and fussy cut the birds. 


I mounted my background panel on my card base and used (my favorite) foam tape to attach the birds and sentiment to the background.


This sweet card is fairly versatile and can be used for really any occasion.


Until next time...
DT Dawn

09:00 No kommentarer

 It's summer vacation for my son so my office/creative time is *limited*! I assume that is, will be or has been the case for the other creative parents out there as well. When you literally have 20 minutes to make a card, usually simple is best.


So today I'm showcasing a cute card to let someone know they are on your mind - that is also very simple and very fast to make!


I focused on using watercolor today as I think many people do not think it is a quick medium to use. If you're painting some detailed or a landscape, it can take more time. But with a simple coloring or background, it can often take less time than markers or pencils to create the same scene. 

I first created the background using just blue and green. while that dried, I painted the cats and cut them out. I then trimmed the background so it fit on my card base.

 The beautiful part is that you can use *any* watercolor you have for this! I used a watercolor set I had purchased for my son by Docrafts.


I stamped the Mathia sentiment, trimmed the piece into a flag shape and then attached the sentiment and cats to the watercolor panel using my favorite foam tape. (You might be tired of me mentioning my favorite foam tape but it really is my favorite and I've used it for YEARS!)

I attached the completed watercolor panel to my card base and Voila! A complete card in under 20 minutes using the most basic of tools!


Until next time...
DT Dawn

09:00 No kommentarer

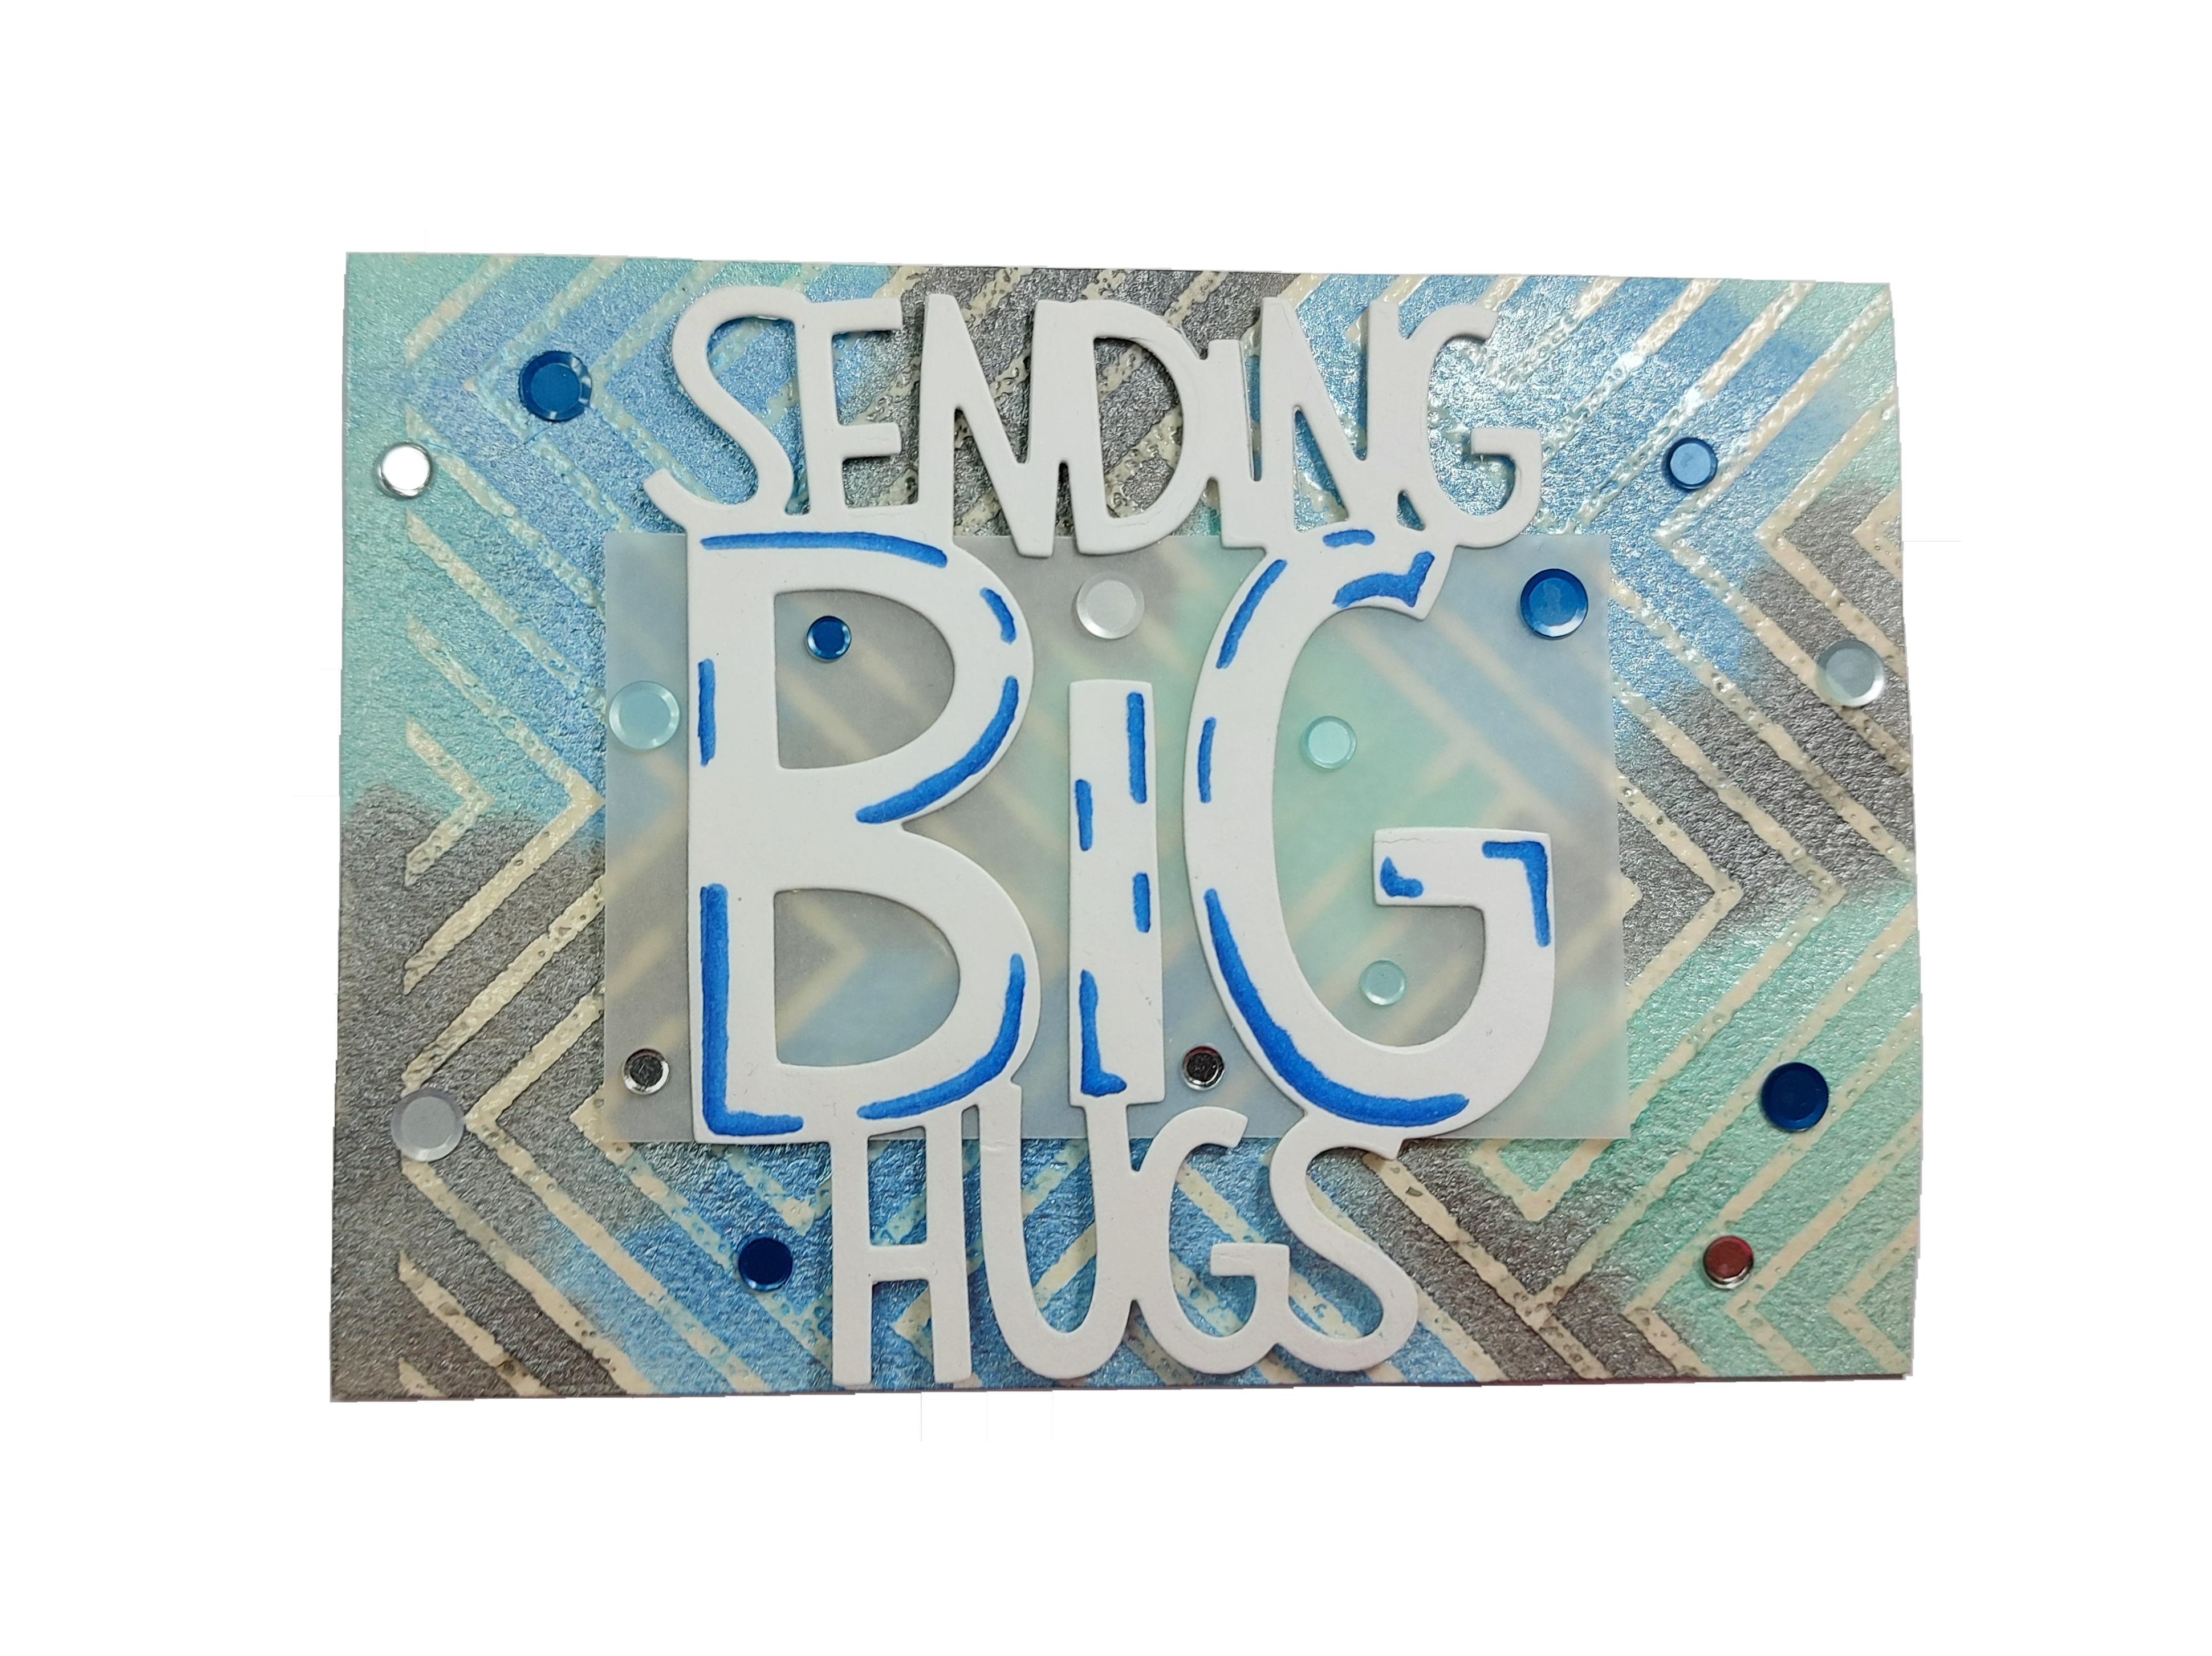
Sometimes you need a card for a male that isn't quite for sympathy but to let them know you are thinking of them. It's rare, mind you, but it does happen. So I tried to bring together all of the elements for a card I would typically use and just gave it a twist so it would be more male acceptable.

I started with a piece of watercolor paper, an old background stamp, and my Misti. (The background stamp I used is no longer produced but this is very similar and an excellent alternative.) After stamping the background on with embossing ink, I added clear embossing powder and heat set it. I stamped multiple times but didn't go for perfection as I wanted it to be lightly distressed in places.

I then added some watercolor paint in more masculine colors and let that blend and dry. This whole process took less than 5 minutes.


I die cut the sentiment and took my B28 Copic marker and added some accents along the word big to emphasize it. I attached the sentiment to a piece of vellum and then used my favorite foam tape cut into little slivers to bump up the whole die cut.


I attached the sentiment to the watercolor panel and then attached that to my card base. I finished it up by gluing some old Pretty Pink Posh confetti (soon back in stock.)


I think it fits the bill when you need something for a male that shouldn't be overly dramatic, feminine or blingy. For a card that took 15 minutes to make, I'd say that was a job well done!


Until next time....
DT Dawn


09:00 No kommentarer

 Good for any gender, this Birthday card is colorful and bright - and also very quick to make!

With the end of the school year came lots of appointments, gatherings, and grilling. I needed a quick birthday card for an unexpected birthday party my son was invited to and 30 minutes later, this was the result.


I started with a piece of watercolor paper and used my Misti (It's best to stamp 3 or 4 times on watercolor paper due to the texture) to stamp an old triangle background stamp with embossing ink. (It's no longer made but this would be a great alternative!) I embossed it with clear embossing powder and didn't worry about getting any excess off as I wanted it to be a little imprecise.

Once it was melted with my heat gun, I used Art by Marlene's Brighter than Bright watercolor and and used all the colors in big splotches. I dried the watercolor with my heat gun and die cut Lawn Fawn's Giant Happy Birthday sentiment in white cardstock.


I cut a small piece of vellum and attached it to the watercolor panel. I then attached the sentiment to that and finished it off with some old shiny stars in rainbow colors. I attached it to my cardstock base and it was done!

This was really a quick and playful way to make a card needed under a deadline!


Until next time...
DT Dawn

09:00 No kommentarer

 Often I find myself making backgrounds when I am feeling creative but don't have a particular project in mind to do. Today's background was the result of one of those sessions. 

Using the Sparkly & Bright watercolor set, I made a soft, pretty background with the yellow, pink, and purple colors. I first embossed Mathia's circle background stamp with clear embossing powder and then just moved color around on the page.

I knew I wanted to add a big sentiment so I turned to Lawn Fawn's Thank you die. To add interest, I added some accent lines with a gold gel pen and then went over it with liquid Pixie dust so the whole card shimmers.


I then cut a small piece of vellum and drew some leaves around my favorite flower bling. I attached the sentiment to the vellum and then popped up the entire vellum piece with my favorite foam tape.

I attached my watercolor paper panel to a card base and it was done! This was a quick and easy card to create, making it on the list of go-to's for cards needed in a flash.


Until next time...
DT Dawn

09:00 No kommentarer


Her er et nytt bilde som er malt med aryl ink. Her er det brukt tre farger fra Kreul - Triton ink - gul, blÃ¥ og sølv. Disse inkene er fargesterke og i akryll, og kan dermed brukes som vannfarger/akvarellfarger.


Her har jeg brukt en tynn akvarellpensel. Lignende og god mÃ¥rhÃ¥rspensel, kan du ogsÃ¥ finne i nettbutikken. Akvarellark er fra Solo Goya.


Bildet er rammet inn. Her er det brukt en ferdig enkel ramme, med A4 passepartout. Innenfor passepartoutet er det brukt et gult ark, for Ã¥ ta igjen litt av den gule fargen i bildet.

Kreativ hilsen fra DT Kirsten


10:00 No kommentarer


Jeg har prøvd noen nye akryllink, og malt  akvarell med disse. Her er det brukt tre farger fra Kreul - Triton ink - gul, blÃ¥ og sølv. Disse inkene er fargesterke og i akryll, og kan dermed brukes som vannfarger/akvarellfarger.


Her har jeg brukt en tynn akvarellpensel. Lignende og god mårhårspensel, kan du også finne i nettbutikken. Akvarellark er fra Solo Goya.


Her er selve bildet skisset opp, før det er malt, med kjent ruteteknikk. Jeg har printet ut et bilde av katten, laget rutenettverk pÃ¥ bildet og et forstørret rutenettverk pÃ¥ akvarellarket. Dette er gjort med grÃ¥blyant. SÃ¥ er motivet kopiert og forstørret innenfor hver enkelt rute. 


Så er rutenettverket visket vekk på akvarellarket og skissen er brukt til å male med ink.


Bildet er rammet inn. Her er det brukt en ferdig enkel ramme, med A4 passepartout. Innenfor passepartoutet er det brukt et gult ark, for å ta igjen litt av den gule fargen i bildet.


Kreativ hilsen fra DT Kirsten

10:00 No kommentarer
Older Posts

Om oss

Her finner du HOBBYKUNST's blogg, et univers av kreativ inspirasjon fra vårt dyktige designteam. Hver uke blir bloggen oppdatert med forskjellige bloggposter av alle slag, og vår drøm er å få flere folk til å være kreative!

På Karihaugen i Oslo finner du vårt fysiske kreative univers, med over 16.000 produktenheter, kursrom og ikke minst fagkunnskap om våre produkter. Designteamet jobber med produkter fra vårt sortiment, og her kan du lære mye i tillegg til å få inspirasjon fra din favoritt designer.

Følg oss

Følg oss gjerne

Totalt antall sidevisninger

Søk i denne bloggen

Labels

3D 49andmarket ATC Aktiviteter Album Alexandra Renke Alkoholblekk Alter American Crafts Art Journal Avery Elle Baby Barnehobby Bazzill Betong Betongpaste Bind it all Bo Bunny Bordkort Brettekort Butikken CAS Carabelle Caran D`Dache Carljin Design Chalk Paint Ciao Bella Common place Copic Copics Crafter's Companion Crealies DIY DT Anne Lise DT Benthe DT Connie DT Dawn DT Franca DT Helle DT Janne DT Kirsten DT Sissel Anita DT Susanne Decoupage Dies Distress Crayons Distress Ink Distress Oxide Dåp Embossing Extreme Sheen Farsdag Favorite things Garn Generell Hobby Graphic 45 Home decor Huldra Designstudio Inkon3 Jul Julekalender Julekort K. Creul Kaisercraft Kalender Katzelkraft Klippeark Kortlaging Kurs LDRS Creative Lawn Fawn Layout Ledlys Lerret Little Darlings Lommescrapping Maja Design Mal Maling Mathia Mathia Design Mathia stempler Mathiablomster Minialbum Mixed media My Favorite Things Neat and Tangled Nuvo Nyheter Oppskrifter Papirdesign Papirprosjekt Picket Fence Pion Planner Pretty Pink Posh Prima Produktanbefalning Project Life Påske Påskeegg Rayher Rayher dies Reprint Rustmaling Scrapbooking Simple Stories Sjablong Smykker Solo Goya Spellbinders Stamperia Stamping Bella Steampunk Stensil Studio Light Studiolight Svarta Fåret Tag Teknikker Tim Holtz Tips Tutorial Washitape We R memory keepers Zig Clean Color Brush adventskalender akrylmaling akvaralltusjer armbånd art impressions bakgrunner barnebursdag binderskort bling blomster blonder bryllup bursdag clean and simple craft consortium die cuts fargelegging folie gaveide gaveinnpakning gavepose gelatos gjenbruk glittertape guttekort hero arts herrekort interiør invitasjon julegave julekule julepynt juleverksted kjøkkenkluter klistremerker kondolanse konfirmasjon kork kort leire mathia blomster mathiastempler morsdag mosegummi oppbevaring oxide pakkelapper paljetter pink fresh restepapir shakercard sjokolade slimline småkort snøpenn stempel ull valentine

recent posts

Created with by ThemeXpose