youtube facebook twitter instagram
Drevet av Blogger.
  • Hjem
  • Nettbutikk
  • Designteam
    • DT Sissel
    • DT Kirsten
    • DT Anita
    • DT Linda
    • DT Annika
    • DT Helle
    • DT Cathrine
    • DT Elin
  • Om oss
  • Kontakt
  • Maler & tutorials

HOBBYKUNST

Dawn har laget inspirasjon på pakkelapper til jul... 

Lag-på-lag med mønsterpapir, 3D-puter og klippemotiv


Selve pakkelappen er en tag dies fra Rayher med 3 størrelser - du finner den her! 

Ellers er det brukt...
 
Forskjellige Maja juleark - siden hun har brukt mye forskjellige så har du link til alle arkene
Klippemotiv -  Pakkelappnissser
Forskjellige bånd finner du i nettbutikken her! 


Herlig julestemning og flotte tager!
 
Kreativhilsen Connie
09:00 No kommentarer

Et litt mer voksent kort til en som kanskje nyter pensjonisttilværelsen,
eller til noen som elsker kulinariske nytelser :-)

 Her har DT Dawn brukt Distress Inks til de forskjellige delene på kortet

Distress Ink Vintage Photo

Distress Ink Walnut Stain

Distress Ink Bundled Sage

Distress Ink Stormy Sky

Distress Ink Faded Jeans

Distress Ink Chipped Sapphire

 Alt er blending teknikk med blending børste!

Motivene er forskjellige klippeark fra Hobbykunst - full oversikt her!


 Stempelteksten fra Mathia design er så klart stemplet med vår favoritt stempelpute
VersaFine Clair Nocturne.
 
Filmstripe dies er fra Craft & You

Kreativhilsen fra Connie

09:00 No kommentarer

Dawn har laget monsterkort med Distress bakgrunn

Distress Inks som er brukt på bakgrunnen er
Twisted Citron, Spiced Marmelade og Squeezed Lemonade.

Dies settet som er brukt på dette kortet er fra Simple and Basic,
og det har en del forskjellige former som kan settes sammen til et kult kort
eller bruke sammen med andre dieser.

 Dies settet finner du her!


 Alle "figurer" og rammer er fra dies settet, stemplene er fra Mathia designs "Monsterplate".

Klippearket finner du her!

Kreativhilsen fra Connie

09:00 No kommentarer


Her har jeg laget en boks som kan innholde en liten tic tac boks. Jeg har lagd boksen i kartong og limt på en rest papir fra Maja Design. 

Stans ut et vindu i boksen før man limer den sammen og etter at mønsterpapiret er limt på. 

Malen ligger under bildene. 


Kutt kartongen i størrelsen: 13 cm x 13 cm
Score på ene siden ved 1,6 cm - 5,7 cm - 7,3 cm - 11,4 cm 
Score på topp og bunn ved 1,6 cm og 3,2 cm (fra begge sider)
Kutt vekk kartongen sånn at den blir lik som på malen og kutt inn ved der det er merket med oransje


DT Dawn


10:00 No kommentarer

 I went out of my comfort zone with this card. I don't often make cards with many layers but I gave it a try with this one.


I used a variety of papers here - Neenah, colored paper and patterned paper. I die cut the Papirdesign sentiment (not the exact same but close) and alpaca from white, red and black cardstock. I then die cut some snowflakes from red and white card stock. I glued the sentiment to a scrap piece of card stock and used a black pen to create some shadows. I covered the hat in glue and dipped it into the flocking powder and brushed off the excess. I glued all of the pieces of the alpacaa together and added some glitter to the white part of the hat.


I then cut all of the panels for the front 2 mm smaller for each piece so they layered nicely together. Using glue and Scor tape, I taped all of the layers together and attached them to my 15 x 15cm card base. I arranged the snowflakes and the sentiment piece and attached them together and then popped up the alpaca with foam tape and added them all to the card.

I don't know about you but I am definitely looking forward to using flocking powder on my Christmas cards this year!

Until next time...
Dawn


09:00 1 kommentarer

 This coloring is sooo easy, anyone can do it. This Christmas card design is sooo simple, anyone can do it. This is a very good card to duplicate easily and quickly many, many times.


This stamp is an old Tim Holtz stamp from my stash. While not available at the moment, there are a number of Tim Holtz stamps that would be equally perfect for this style card. This one would be perfect!

I stamped the image and the sentiment from Mathia's typograf stampset in black ink on a card panel. I took my Copics and chose a light and a dark for each color family - R27, R20, G09. G02, C4 and C2. I used the lighter color along the edges of the coloring area and the darker in the center.

I then ran the card panel through my Big Shot with the MFT Wonky Stitched rectangular die. I attached my card panel to my card base and it was all done. So simple, so easy but still so nice!

Until next time...
Dawn

09:00 No kommentarer


I am *always* in the mood to make Christmas cards. If I could make nothing but Christmas cards, I would be a very happy girl. 😁 So I started a bit early this year.


I first stamped various snowflake stamps I have in my stash (but you could do this with dies as well), with Broken China and Prize Ribbon Distress Inks on a card panel. Once they dried, I stamped more snowflakes with embossing ink and heat embossed them with a silver sparkly embossing powder. Once they had cooled, I stamped a few more snowflakes again with embossing ink and heat embossed them with white embossing powder. 


I stamped Mathia's sentiment from the Nedover tekst stampset with Broken China Distress Ink and then trimmed the panel. I took another card panel and ran the Prize Ribbon stamp pad around the edges so it would frame the smaller panel.


I attached the panels together with Scor tape and attached them to my card base. 

I thought about adding a few pieces of bling to the card but I thought the sparkling embossing powder was blingy enough.

Until next time...
Dawn

09:00 No kommentarer

 School starts in just a few days and I will again have time to be creative without interruption! But since I don't have that right now, here's another 5 minute card with some Distress Ink blending and embossing.


I started by blending the center of my card panel with Candied Apple Distress Ink. I then took Ground Espresso and went all around the edges. I went back and forth between the 2 colors until there was a soft blend between them. 

On a side note, would you want to see a video of Distress Ink blending on these types of cards? Add a comment, på norsk or in english, and let me know. I am willing to do them but I'm uncertain if you would want to see them.

After the background was blended and dried - let Distress Ink completely dry before embossing - I stamped the trees and a sentiment from Mathia's Artsyplata with embossing ink. I heat embossed both with white embossing powder and trimmed it so it was slightly smaller than my card base.


I took my silver gel pen and drew inconsistent lines (it's easier than completely straight lines and I think it gives it an artsy feel), along with stars and dots around the trees and sentiment. I attached the card panel to the card base with Scor tape and it was complete!


Until next time...
Dawn

09:00 No kommentarer

 It's harder to be creative in the summer with children home so I've focused on very quick cards to make this summer season. This month will be no different!


First I stamped Mathia's gratulerer background stamp and heat embossed it with white embossing powder. Then I took Mermaid Lagoon, Prize Ribbon and Chipped Sapphire Distress Inks and went from light to dark, from top to bottom.

While that dried, I added Lucky Clover Distress Ink to a spare piece of cardstock and die cut out multiple leaf shapes - this die set is perfect for different shapes and sizes. I also die cut a couple of different sized hexagon shapes from more spare cardstock. I then stamped Mathia's sentiment on another spare piece with Versafine black ink. This was a great card to use up spare scraps!


I layered all of my die cut pieces together so it looked pretty and taped them all together. Then I took the sentiment and used foam tape to attach it to the die cut bundle.


By this time the background was dried so I attached it to my cardstock base and then attached the complete die cut bundle to the card. All in all this card took about 15 - 20 minutes to make, most of it just adjusting the leaves so it looked nice!

Until next time...
Dawn


09:00 No kommentarer

 I really just wanted to start adding this Shiny Mix washi tape to everything, just splashes of iridescent color everywhere! This is the same washi tape I talked about it my last blog post. I'm still a little obsessed with it. I'm also very glad I took pictures of it after just 2 cards because the rolls are quite a bit smaller now.


So I thought, why can't I add it everywhere? I had planned to use patterned paper with this card as a half and half card but I couldn't resist and added some shiny and iridescent washi tape here too.

First up, I stamped the mother and her newborn image from Stamping Bella (currently out of stock but linked to other SB options), on to a piece of Neenah card stock. I colored her up with my Copics - E01, E21, E50, E51, E53, E93, E95, Y00, Y02, R05, R37, YG06, G09, B32, B34, B41. I trimmed the panel so it left a nice big section for the patterned paper.


I attached the patterned paper to my card base first. Then I attached my colored image to the top of that. I added the washi tape as a pretty transition between the 2 sections. I took the thin sparkly piece and cut it in half using a ruler and a hobby knife (it's pink!) and added those pieces on.

Another quick and simple card, perfect for summer time creativity!

Until next time...
DT Dawn

09:00 No kommentarer

 I got some new washi tape in my hot little hands! I'm not a big washi tape user but I loved the iridescent qualities of some of the rolls and the sparkly qualities of others. As I'm always up for a challenge that pushes me to use things I don't normally use, I took this home and started playing.


I started by stamping one of my favorite mother and daughter stamps from Stamping Bella and my Mathia sentiment (currently out of stock but linked to other options) on a trimmed Neenah panel. I colored it in with my copics - E00, E01, E02, Y00, YR21, YR23, C6, C8, C10, G40, G43, G46, YG06, R81, R83 & R85.


I took another Neenah panel cut to A2 size and lined up the washi tape along each edge. I attached that panel to my card base and then attached the colored image so it was centered and had that lovely iridescent border.


It's summer time and the child is home so I'm going for quick and easy cards this month! 


Until next time...
DT Dawn


09:00 No kommentarer

 Last month I showed a card I had made with flock. It was my first time playing with it and I wanted more experience so I tried again.

And I really think this is an adorable baby card. Flock comes in all different colors but at the time I only had these 2 to play with. I may or may not have more colors now. 😉

 So first I die cut these elephants out of Neenah card stock. Then I used some Zig glue and covered the die cut. Then I pressed the die cuts into the flock. I sandwiched it between a piece of paper and made sure to burnish in the flock. Then I tapped and rubbed off the excess. 


I repeated that process with the other 2 elephants, alternating with gray and green, and set them aside to dry completely. While they were drying, I die cut the background pieces out of green and white paper and attached them together. I stamped the sentiment from a Mathia stampset, (that will hopefully be back in stock soon), with Versafine and Mowed Lawn Distress Ink.


 I then attached those panels to my card base and used a little more Zig glue to attach the elephants. Flock couldn't be more perfect to use on a child's card!

Until next time...
DT Dawn


09:00 No kommentarer

 Another C&S 5 minute card today! I took my favorite colors, my favorite blingy embossing powder, one of the new Mathia stampsets and made a card my bestie loved receiving.


I took a panel of Neenah cardstock and lightly inked the edges with Kitsch Flamingo and Wilted Violet Distress ink. Then I set up all of my stamps (all from the same Mathia stampset), on the page so I knew where they were going to be and stamped the top and bottom sentiments along with the butterflies in the same Distress ink colors. Then, the most important part, I let them all dry. Distress ink stays wet a little longer than most so it can blend well. But embossing when almost the whole page is wet is a big no-no. 


I'm also impatient so instead of waiting for it to dry, I used my heat gun and sped up the process. You could also do the embossing first and add all the color on after but I just wasn't thinking that day. Once it was dry, I stamped my main image with embossing ink and heat embossed it with a silver powder that has sparkle to it. 


Just look at that shine! I trimmed the panel so it was slightly smaller than my card base and attached it. I added some random bling with glue and within 5 minutes had this pretty card.

Until next time...
Dt Dawn

09:00 No kommentarer

 A little while ago I received a challenge to use a product I had never used before - flock. It's the stuff that is typically seen on commercially available greeting cards that make animals fuzzy to the touch .

I mostly color and paint so this was far from my expertise but I like a good challenge every once in a while so I was in! And here's one of the cards I came up with.


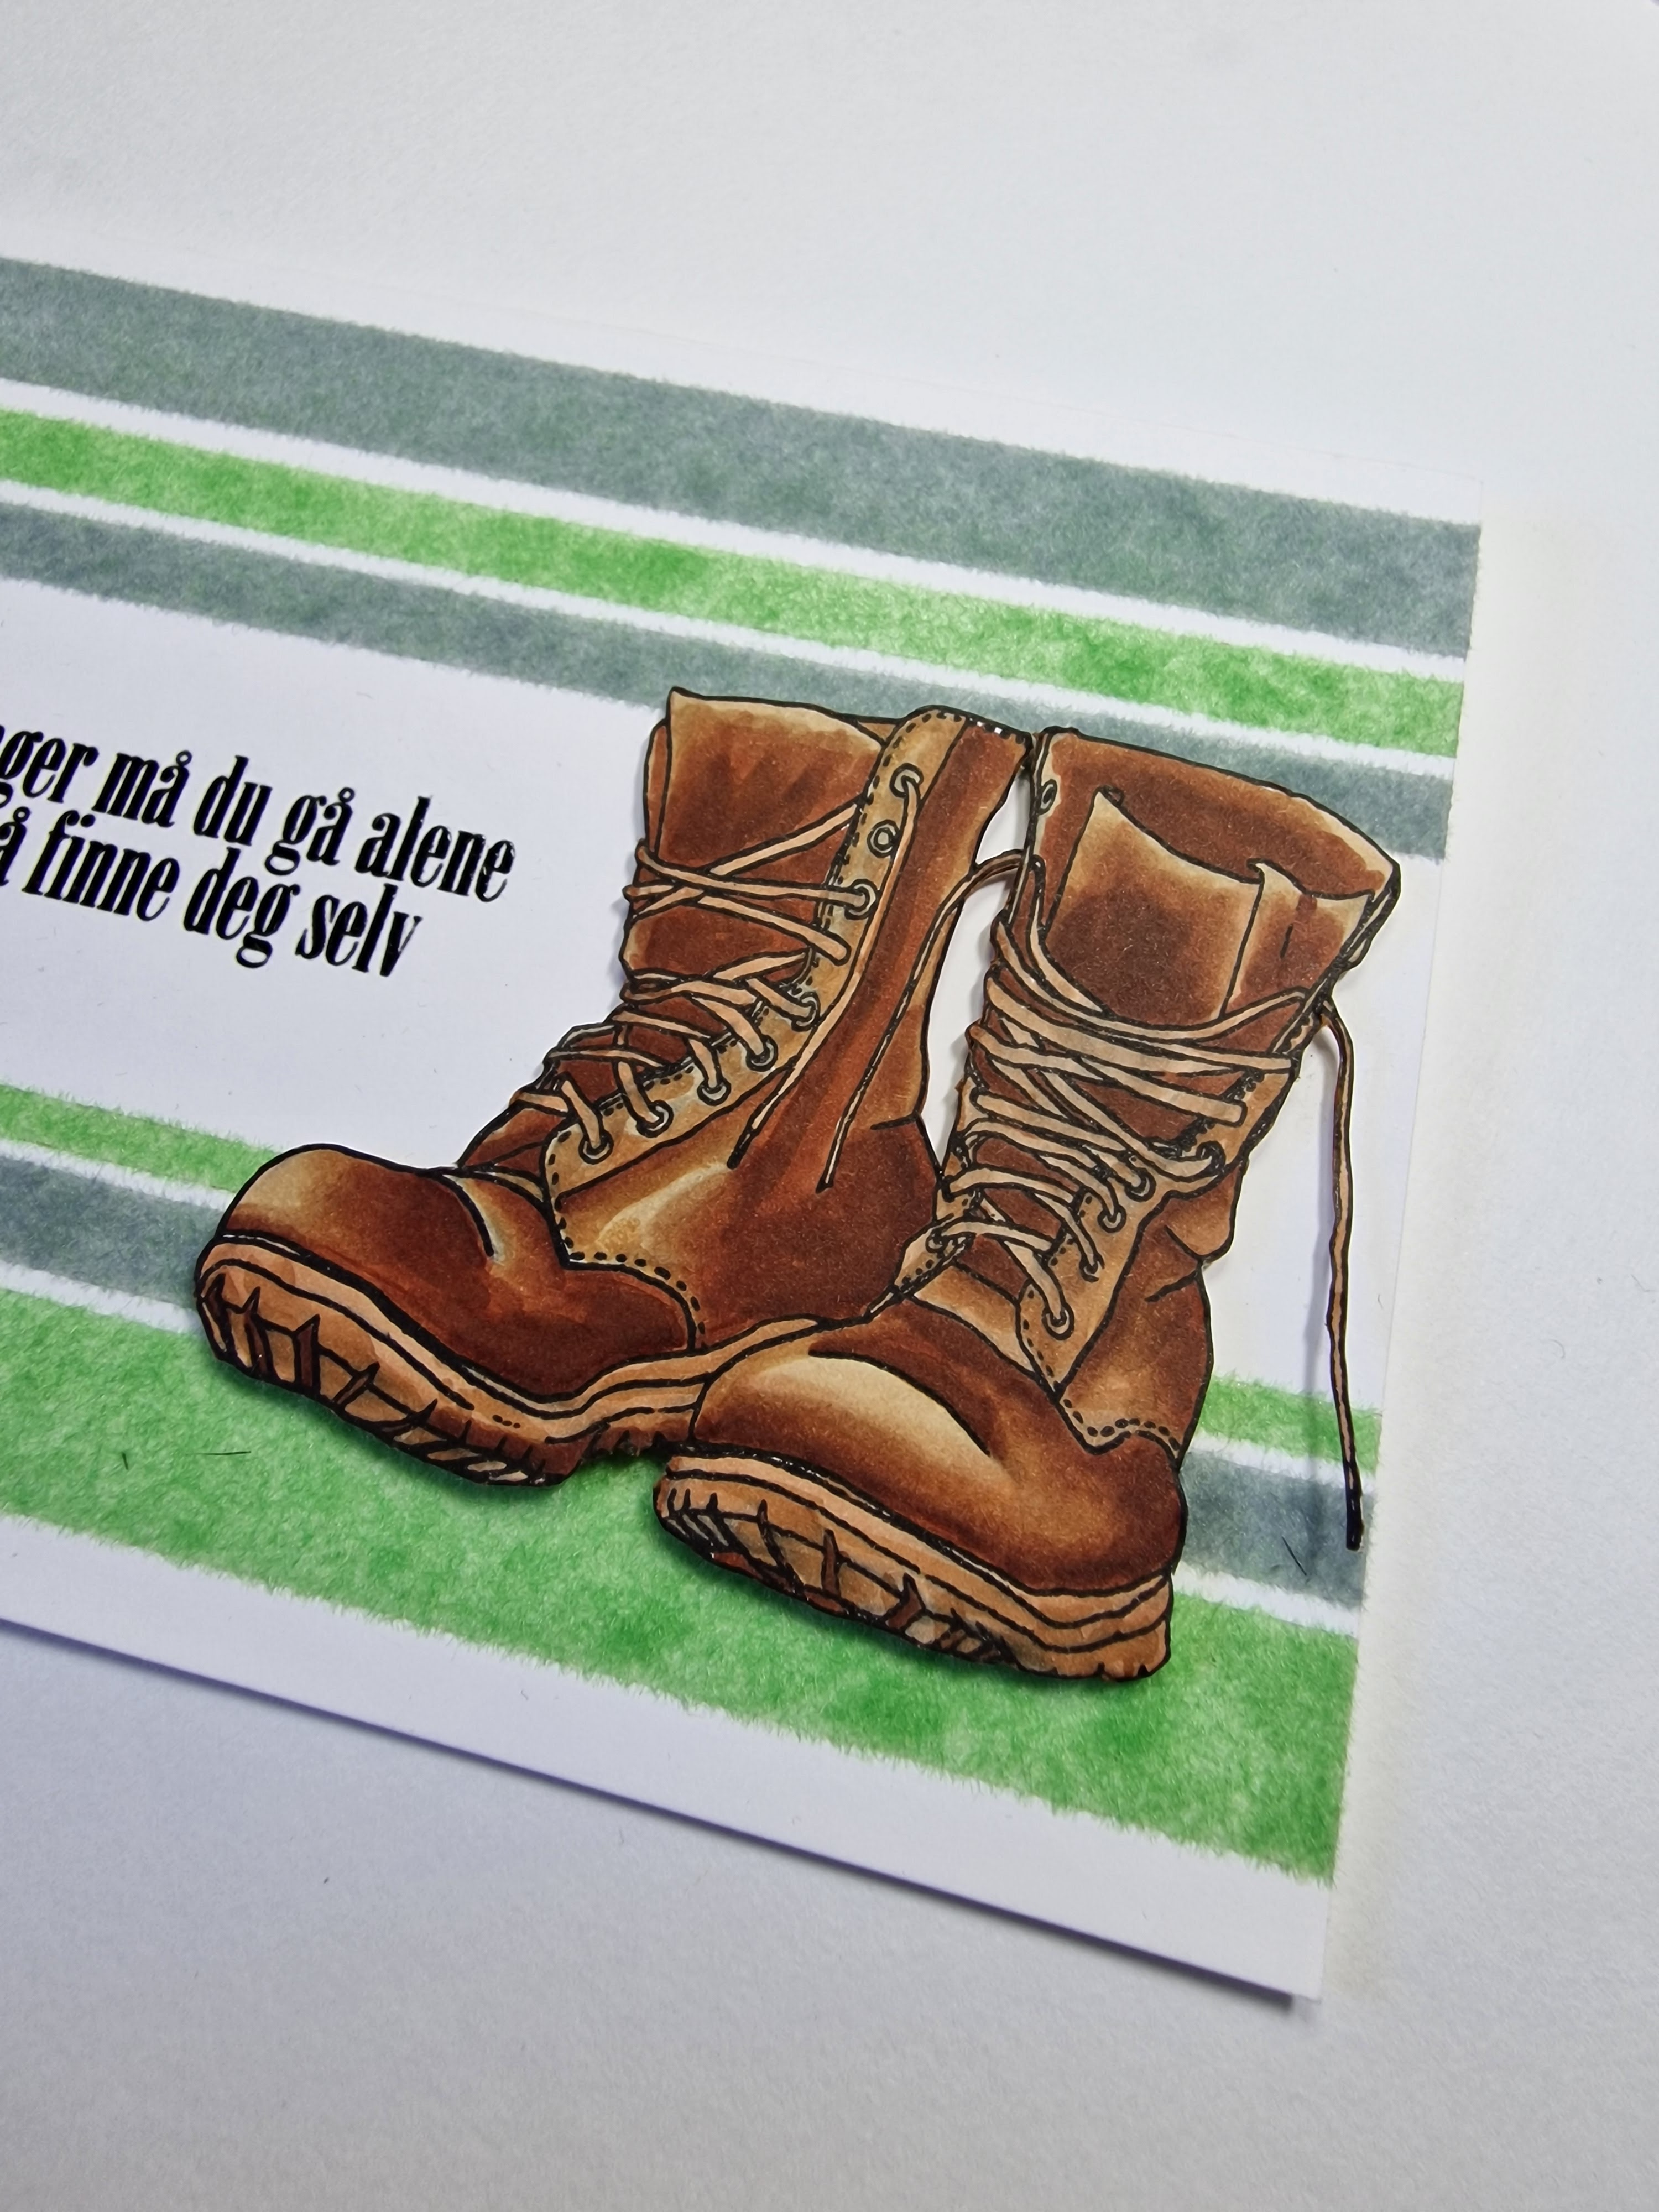
 I admit, the coloring of the boots may have been a little cheaty but I needed something else on the card so.... that's ok, right? First I stamped and colored up the Mathia boots with my Copics and fussy cut that out. Then it was on to the flock.


After watching numerous videos and reading an equal number of blog posts, I felt confident enough to start playing with it. It seemed the easiest method was to use double sided tape. So I grabbed a piece of Neenah and Scor tape in different sizes and started playing. It turned out to be incredibly easy and not at all different than using embossing powder. Really the 2 differences between flock and embossing powder are that 1) you burnish, or press in with a bone folder, the flock to make sure all of the tape is completely covered, and 2) you don't heat emboss it to set it.


Alternating between gray and lime green flock, I did each piece separately so I wouldn't mix colors and just kept at it until I had 6 completely fuzzy stripes. It was fun to feel the card after and it gave me a few ideas for Christmas time!

Once that was done, I stamped the Mathia sentiment in Versafine ink and very carefully heat embossed it with clear embossing powder. I attached the finished panel to my card base and then attached the boots with foam tape to pop them up. 

I hope I've inspired you to try flock! It definitely adds something special to cards. 

Until next time...
DT Dawn

09:00 No kommentarer

 Mathia Design has come out with new stampsets and I have been playing with all of them. Today I'm sharing a simple flower card from one of the new sets. You don't always need lots of bling and glamour on every card, sometimes simple is best. And this card fits that bill!


I started by stamping the image in black ink on to some Neenah card stock. I then stamped my sentiment from the same stampset with Kitsch Flamingo Distress Ink. I took another panel and using the stamp pad itself, rubbed it all along the edges so it would make a nice, matching border.


I colored in the flower with my Copic markers and then trimmed that panel so it would look like the panel underneath was a pink border. I attached the panels together and then attached them to my heavy duty card base. I glued on some bling and the card was done! Clean, simple, and fast!

Until next time....
DT Dawn

09:00 No kommentarer

 In my last post I shared how I typically create shaker cards. The process for this card is the exact same, except you add a *lot* more bling inside. It doesn't shake as much as one with less goodies inside but is more stuffed to the brim with goodies!


I used most of the dies from this set and die cut them out in alternating colors. I stamped my sentiment first from this Mathia stampset with Versafine ink and then heat embossed it with clear embossing powder. I set up my windows with scor tape, acetate, and foam tape (see my previous blog post for a more detailed explanation.) I filled the windows with a ton of various bling and attached all the panels together. 


 You can see they are packed and right up against the acetate window! I attached this very heavy panel to my strong card base and she was done. A great birthday card to have on display next week when we all celebrate!

Also, for my fellow geeks out there, May the 4th be with you!

Until next time...
DT Dawn

09:00 No kommentarer

 Sometimes an idea turns out even better than you guessed it would. This card is one of those for me. I love how it's simple, colorful, fun to look at (and play with!) and just makes people smile when they see it.


Shaker cards can be intimidating but simple shapes help to simplify the making of them. There are a number of ways to make them as well, which is also confusing. This was the first way I learned and how I continue to make basic shaker cards.

I cut 2 pieces of heavy duty card stock to 216mm x 89mm. On the first piece, I lined up my cutting die so it was centered and cut that out. I put that piece over the 2nd piece and put them into my Misti. This let me know exactly how the butterflies would look through the small windows. I kept that top piece in throughout all of the stamping. I stamped the 2 butterflies from the Mathia Hurra for deg stampset in Distress ink colors Festive Berries, Carved Pumpkin, Mustard Seed, Mowed Lawn and Prize Ribbon. I then stamped the 2 sentiments from the same stampset with Villainous Potion (to keep with the rainbow theme.)


I took the top piece, flipped it over and first added a piece of acetate with some score tape. I then added foam tape along all of the sides of the cutouts, including in between all of the squares. I took my powder tool and wiped it along the inside of the foam, where the bling would go, so sequins wouldn't get stuck on any tape. It's not 100% foolproof but it helps a lot to keep the sequins moving. I blew out the excess powder and then wrote down which color went into which square. Remember, it's upside down now so you have to remember to add things in backwards when it's color coordinated like this. (This tip was added after I didn't do that the first time and had to make a 2nd with the colors in the right places!)

I added more foam tape around the outer edge of the piece and then started adding bling, all different kinds as long as they matched the color I needed, to each square.You can add as much or as little as you want - there are no rules! If you want the sequins to move, add less. If you want them very blingy, add more. (I'll have a blog post soon with a 'stuffed' shaker card.)


The hardest part is placing the butterfly stamped piece on top of the foam tape correctly. I found that standing up and looking directly over it is the easiest way. If you go slowly, you can make micro-adjustments until the very last second. But if that scares you or seems impossible, you can always add another piece of acetate over the boxes so the sequins are trapped and the stamped images can still be seen. Then you can add the 2 pieces together in the normal-for-you way. 

After that it's just a matter of attaching that panel to card base. You could also stamp the butterflies directly on to your card base if you wanted to skip having an extra piece of cardstock on the card but I like the heavy feel of a shaker card. It doesn't feel like it will break when it's shaked and trust me, it will be shaked a lot!

Feel free to ask any questions in the comments!

Until next time....
DT Dawn


13:00 No kommentarer

 I guess technically this card could be considered Clean & Simple but I thought modern grunge'ish felt more appropriate. Generation A is having their confirmations now so I tried to design a card that they might like to get. 

I colored up Martine from Mathia Design in a rainbow sweater (because equality) and gave a little extra color in her hair (individual expressionism) but made the rest casual (comfort).


I started off with stamping Martine and the 2 sentiments, one from the Martine stampset (in Villainous potion) and the other from the Nedover tekst stampset (in black). I stamped all of those images on mask paper, fussy cut them out and covered them on the panel. I then stamped the sirklebakgrunn stamp with embossing ink and heat embossed it with silver embossing powder. I didn't want any of the previous stamps to be affected which is why I used the masks. I also brushed off some of the embossing powder before heating to give it an incomplete, grunge type feeling.


I removed the masks from the panel and colored Martine in with my Copic markers. I really liked how the rainbow sweater came out and it wasn't that difficult to do. (Instead of coloring a solid line, tap the marker to make an irregular line and blend it with the colors on either side of it.)

Once she was colored, I added Salvaged Patina Distress Ink to the background, lightly, with my blending brush. I trimmed the panel so it was slightly smaller than the card. I took another panel (cardstock cut to the size of the card), and rubbed the Salvaged Patina ink pad along the edges so it would match the colors used in the card. I then attached both panels to my card base. I hope you like it!

Until next time...
DT Dawn

09:00 No kommentarer


I love rainbows and I love making cards with colorful rainbow on them. While this one might seem complicated, with the aid of a Misti, it's quite easy to make. 

I found the center of the card and stamped the main Birthday greeting from the Nedovertekst stampset in Versafine ink. I knew then how much room I had on both sides. I put the stamp in my misti so that I could move my card evenly to stamp all the colors. I used the background grid of the Misti as my guide and slid it 2 squares to the left, and later to the right, to stamp all of the colors I wanted.


I stamped Gratulerer, also from the same stampset, in Festive Berries, Carved Pumpkin, Mustard Seed, Mowed Lawn, Prized Ribbon, and Wilted Violet, giving me a vibrant and colorful rainbow.


I then took the heart shaped balloons from the Mathia Vennertekst stampset and stamped them in Twisted Citron and Saltwater Taffy. I used a black pen to draw over the strings and add a little bow. I attached the panel to my card base for a rainbow colored, clean and simple birthday card.

Until next time...
DT Dawn


09:00 No kommentarer

 With the confirmation season right around the corner, I thought I'd try my hand at a card for a boy that could be used for it, or maybe just a basic birthday card!

This one is pretty simple and very easy to duplicate. First, I took a piece of watercolor paper and made a big blue puddle on it with watercolor paint. I let that dry and in the meantime, stamped Morten on to another piece of watercolor paper. I painted him in with watercolor and once dried, fussy cut him out.

I cute the background piece into even pieces and attached them to the card. Then I stamped the sentiment multiple times in Versafine ink, staggering them so they could be read no matter what was added on top.


I attached Morten to the panel and then attached the completed panel to my card base. 

Until next time...
DT Dawn

09:00 No kommentarer
Older Posts

Om oss

Her finner du HOBBYKUNST's blogg, et univers av kreativ inspirasjon fra vårt dyktige designteam. Hver uke blir bloggen oppdatert med forskjellige bloggposter av alle slag, og vår drøm er å få flere folk til å være kreative!

På Karihaugen i Oslo finner du vårt fysiske kreative univers, med over 16.000 produktenheter, kursrom og ikke minst fagkunnskap om våre produkter. Designteamet jobber med produkter fra vårt sortiment, og her kan du lære mye i tillegg til å få inspirasjon fra din favoritt designer.

Følg oss

Følg oss gjerne

Totalt antall sidevisninger

Søk i denne bloggen

Labels

3D 49andmarket ATC Aktiviteter Album Alexandra Renke Alkoholblekk Alter American Crafts Art Journal Avery Elle Baby Barnehobby Bazzill Betong Betongpaste Bind it all Bo Bunny Bordkort Brettekort Butikken CAS Carabelle Caran D`Dache Carljin Design Chalk Paint Ciao Bella Common place Copic Copics Crafter's Companion Crealies DIY DT Anne Lise DT Benthe DT Connie DT Dawn DT Franca DT Helle DT Janne DT Kirsten DT Sissel Anita DT Susanne Decoupage Dies Distress Crayons Distress Ink Distress Oxide Dåp Embossing Extreme Sheen Farsdag Favorite things Garn Generell Hobby Graphic 45 Home decor Huldra Designstudio Inkon3 Jul Julekalender Julekort K. Creul Kaisercraft Kalender Katzelkraft Klippeark Kortlaging Kurs LDRS Creative Lawn Fawn Layout Ledlys Lerret Little Darlings Lommescrapping Maja Design Mal Maling Mathia Mathia Design Mathia stempler Mathiablomster Minialbum Mixed media My Favorite Things Neat and Tangled Nuvo Nyheter Oppskrifter Papirdesign Papirprosjekt Picket Fence Pion Planner Pretty Pink Posh Prima Produktanbefalning Project Life Påske Påskeegg Rayher Rayher dies Reprint Rustmaling Scrapbooking Simple Stories Sjablong Smykker Solo Goya Spellbinders Stamperia Stamping Bella Steampunk Stensil Studio Light Studiolight Svarta Fåret Tag Teknikker Tim Holtz Tips Tutorial Washitape We R memory keepers Zig Clean Color Brush adventskalender akrylmaling akvaralltusjer armbånd art impressions bakgrunner barnebursdag binderskort bling blomster blonder bryllup bursdag clean and simple craft consortium die cuts fargelegging folie gaveide gaveinnpakning gavepose gelatos gjenbruk glittertape guttekort hero arts herrekort interiør invitasjon julegave julekule julepynt juleverksted kjøkkenkluter klistremerker kondolanse konfirmasjon kork kort leire mathia blomster mathiastempler morsdag mosegummi oppbevaring oxide pakkelapper paljetter pink fresh restepapir shakercard sjokolade slimline småkort snøpenn stempel ull valentine

recent posts

Created with by ThemeXpose